Normally I’m pretty hopeless on work-in-progress posts, but today I’m putting up a kind of step by step on how I make up a dio base as I have had a few requests, and I managed to take some photos this time as well.
- Cut a piece of MDF or whatever wood you choose to required size. I have used three ply but it tends to warp. Here I have cut another (slightly larger) as a plinth. Prime these and paint the colour you desire .

2. Cut a piece of foam board to the size of your base, this being the smaller one if using a plinth . (See the white piece on the left)

3.Glue the foam board to base .
3. Check that it looks ok when placed on the plinth

4. Weigh it down and allow to dry.
5.I don’t keep the plinth attached when building upon the base but before I put it aside I align the base upon the plinth and from underneath drill some holes and fit some screws. This is so It is easily ready for assembling at the very end.

Remove the screws but don’t forget to mark both the base and plinth in one corner so when you screw them together down the track you will know which corner goes where.

6.Now we need to add some undulation to form our terrain. On this one there is only going to be a slight rise towards one end so I don’t have to add much. As you can see in the photo below I tend to slice the foam board in half length wise so as to build up the incline gradually .

In this photo you can see that I have used pins and clips to hold all in place until it drys.

Here I have added the last pieces of foam board to complete the rise I require. If you are going to add boulders or large rocks now is the time to position them. You can position trees to get the feel if you want ,but don’t glue them in as you will need to remove them for the next step .

This is just a shot to show the layers (2 1/2 sheets of foam board. I will say now if you want big hills I wouldn’t use foam board as it is not that cheap, instead I would go for good old Styrofoam with some layers of plaster gauze, just like they use on broken limbs – you just wet it and lay it over the Styrofoam. I’m sure there is a youTube on how to do this .

7.Here you can see that I have plastered over the rough foam board and filled in any gaps with Selleys spakfilla to make a smooth covering. I do about three coats, sanding back lightly between each until I’m happy that all the foam board is covered. I’ve sprayed this so you can make out the undulations .
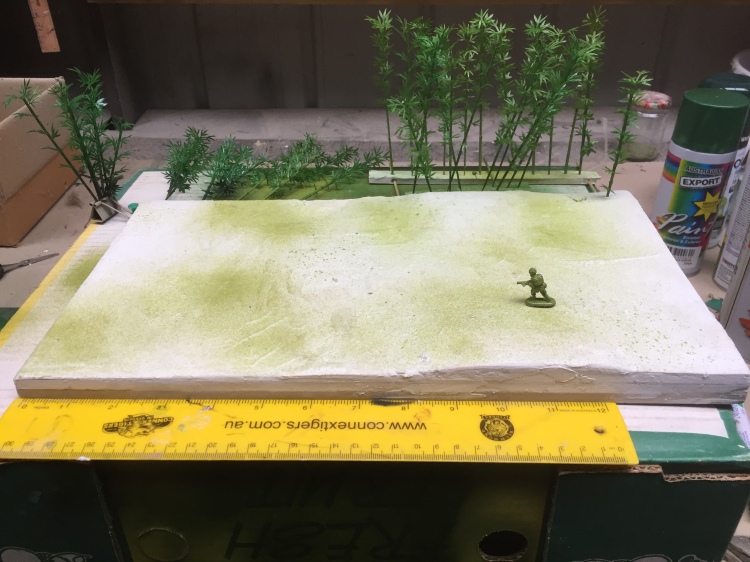
8. Now I paint the base with tones that will be the colour of the ground that you require (if creating a snow scene leave white ) I have also added a bit of the grass colour I’ll use. I have just placed the base on the plinth temporarily to check the look .

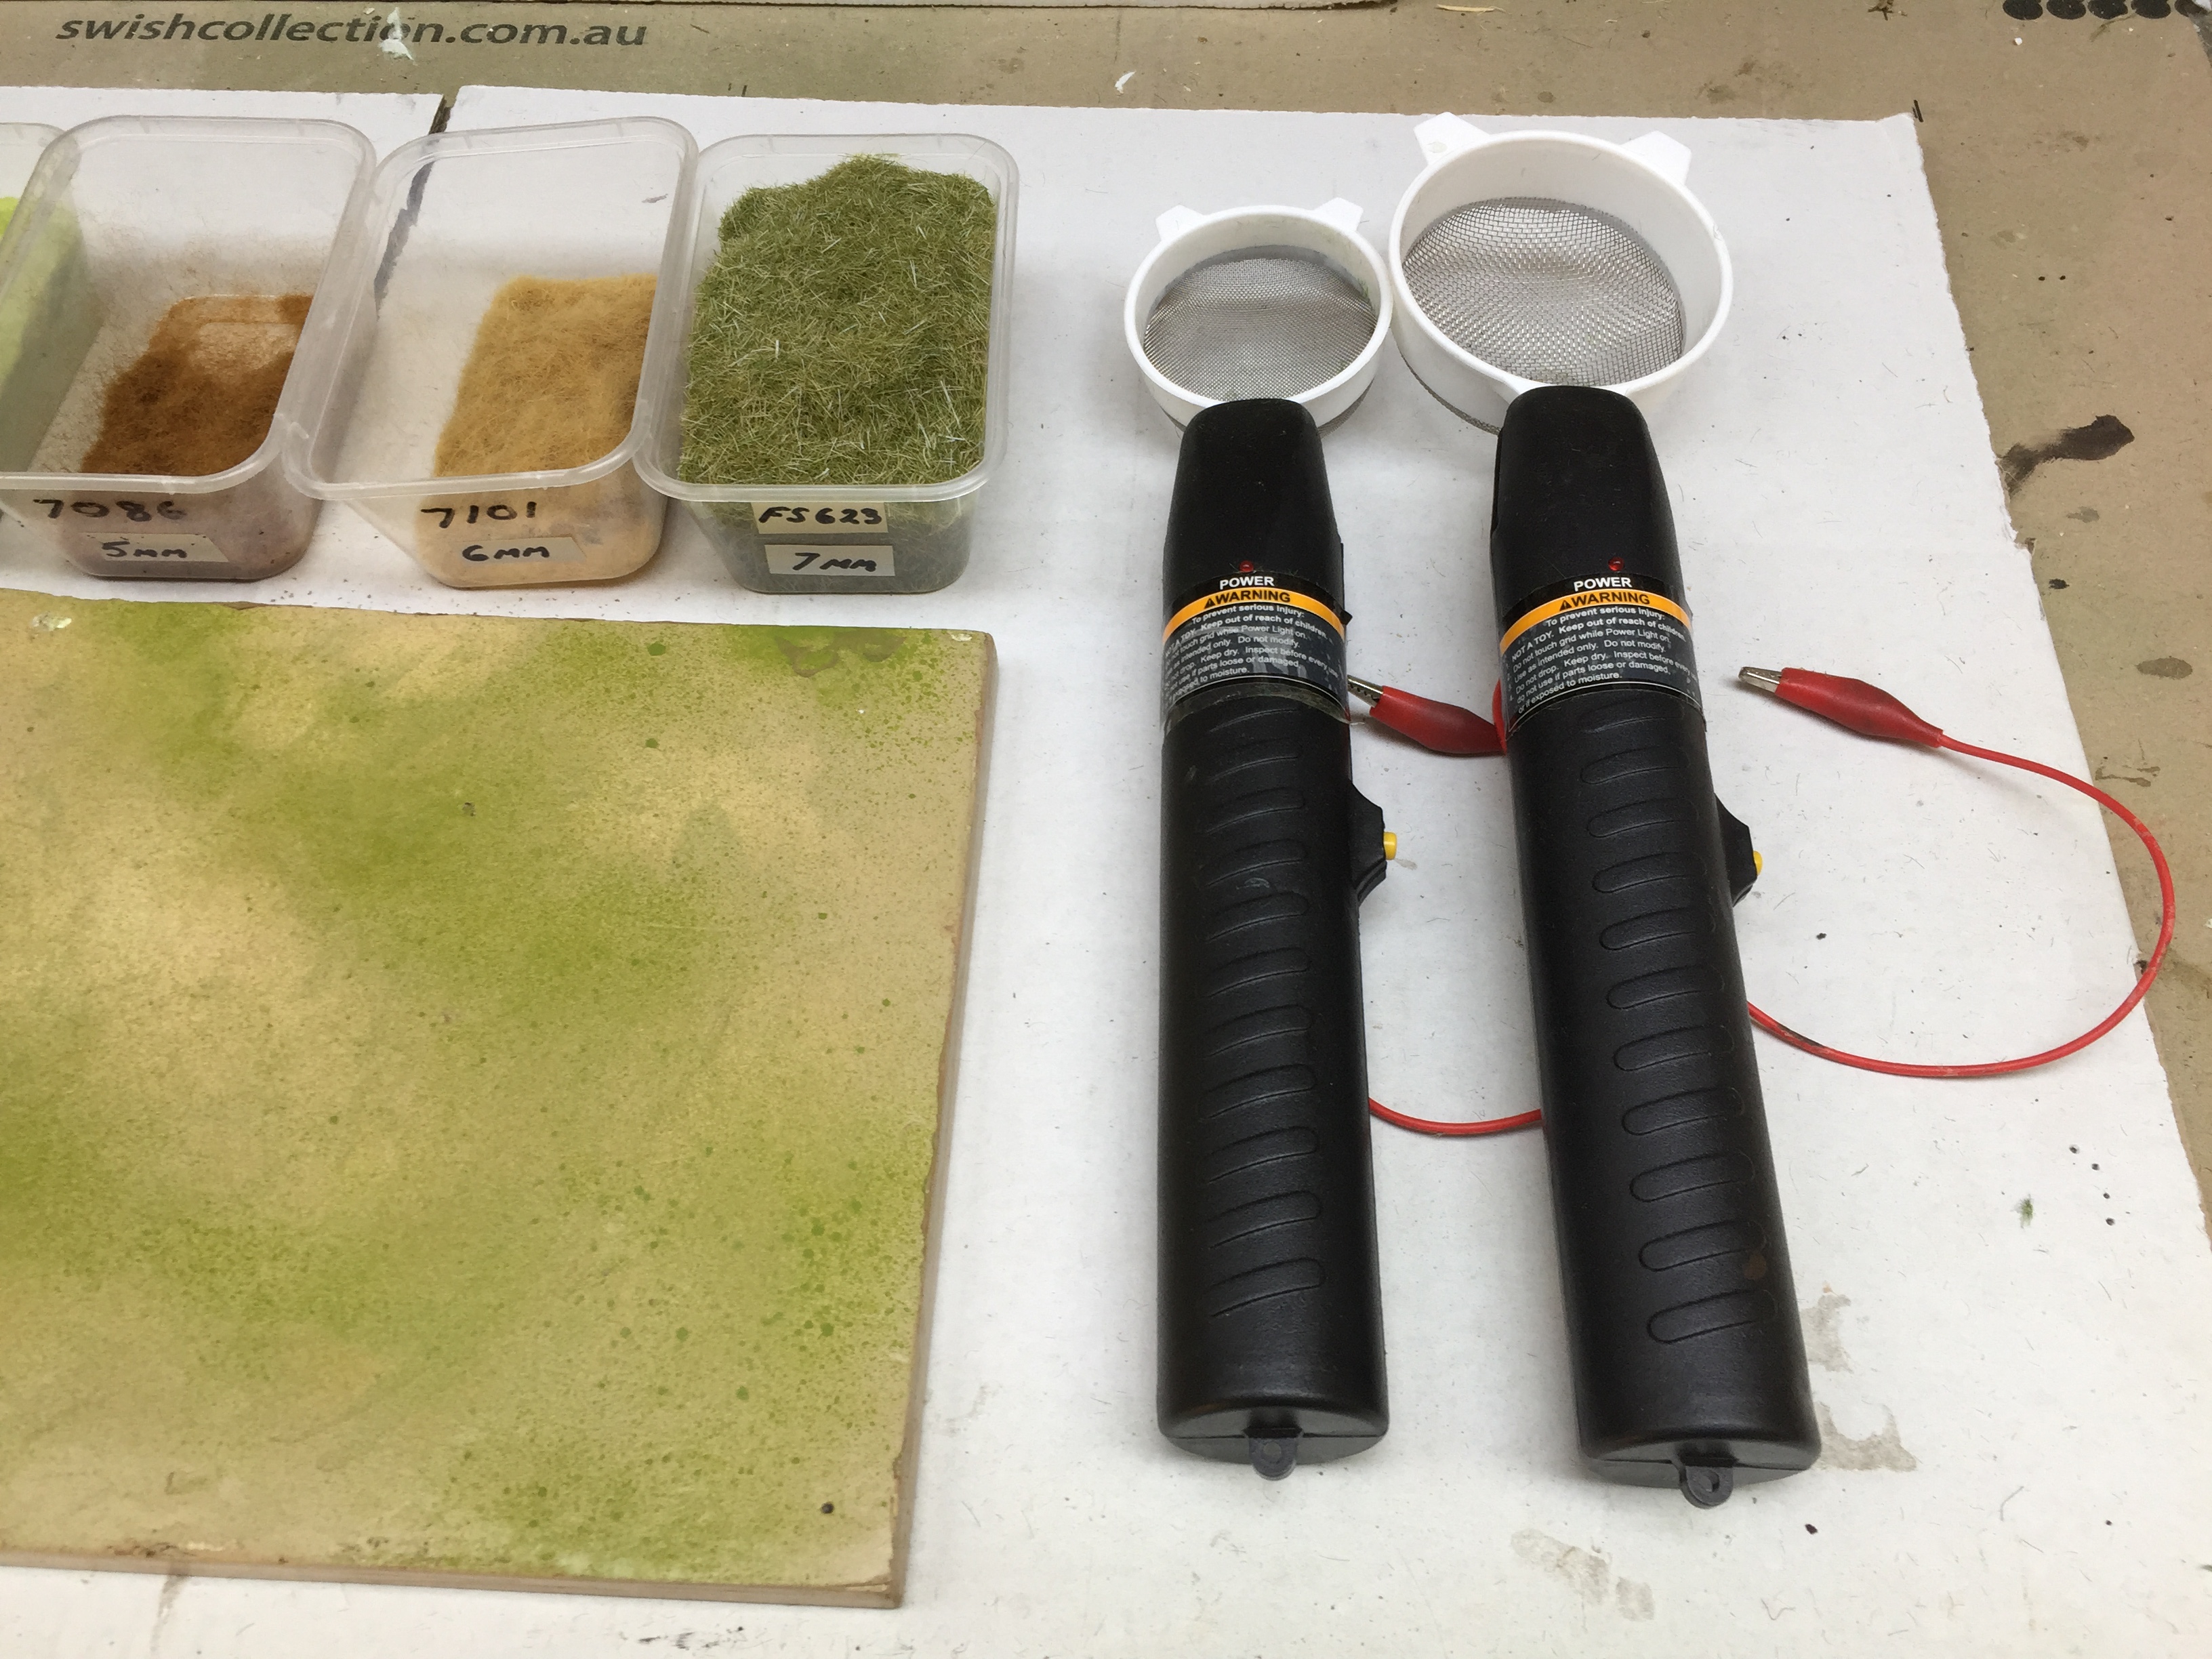
9. I’m going to use static grass on this one so I have chosen the colours I think I’ll need ready for use, you don’t have to rush out and buy static grass equipment straight off as you can get a good effect just using good old scatter turf .
Here are some of the turfs I could have used, they are simple to use and I have found them to have a good effect. To see the results of their use you may wish to take a look at my Napoleonic and medieval village dioramas.

This is just a photo of two static grass guns I purchased for $50AUD for both (a good deal so look around before paying big bucks). I find having the two sizes very handy; the larger for open fields and the little guy for tight spots and smaller areas. I won’t go into how-to-operate as there are plenty of how-to videos on the net, better than I could produce so you just need to Google this. A word of warning – these guys can be dangerous so read the instructions and be careful. For just two batteries they give of a big shock !

10. I have applied my grasses and some tufts plus sawdust and wood shavings to get the general layout before starting to add the bamboo, trees and shrubbery .

Just a photo of how much super glue I use (it looks like an advertisement my girls said but no – I get no rewards from the brand unfortunately). I’ve tried all brands and as you know by now every one of them works best on human fingers especially when doing a delicate gluing job – sure as sh…t.

Now its’ just finding out where everything fits in. I like this bit the best as I love to create my own plants from things I find in the garden or out on a stroll. The log below is an old twig covered with lichen I found going to vote in the local council – the only good thing they have done for me – only kidding . The other thing I do is buy cheap plastic plants online and in the aquarium section in dollar shops and doll them up myself. A bit of paint here and there can get rid of that plastic-look pretty quickly, so keep your eyes peeled in the shops.

Here’s the bamboo and palm trees after a bit of spray paint. A tip here, if you don’t like the shiny effect use a product from the art supply shop called ‘acrylic medium matt’, the brand I get in Melbourne is called Mont Mart. Just dab it on with a soft bristled paint brush .

Just a tree fern I fashioned from a bit of plastic plant and a stick with saw dust glued on .

I must be proud of this, I’ve taken two shots !

More shots of vegetation. The vines are just green cotton sprayed with adhesive and either rolled in 1mm static grass or other types of flecks from model shops

Other bibs and bobs. It’s hard to see in the photo but the palm log on the left resting on the base (photo below) is just a stick with fine wire wound around it and smeared with some plaster, these I used to make the bunkers out of.
Well that’s pretty much it, all that’s needed when you have finished is to screw you base onto the plinth if you did one.
I trust this has been of some help. Please feel free to contact me if you need some clarification on anything mentioned .


theimperfectmodeller
Really nicely put together tutorial Pat, something to do more of if you’ve a mind too perhaps. There are plenty of people who would be grateful to see how you put things together, myseld included. I’ve yet to do anything using vines, something to remedy, but when I do I will have a go at your method. Wouldn’t have thought to do them that way, probably why I have never done one yet!
LikeLiked by 3 people
patmcf
Thanks Dave I feel that having the long service leave and being a small job my mind didn’t wonder and I remembered to take photos as I went along .I actually liked doing it in the end and you saying that it helps will prompt me to try and include more in the future , I’m glad you enjoyed your big outing even though it would have been a mammoth one !
LikeLiked by 3 people
John@justneedsvarnish
Nice tutorial, Pat, enjoyed reading through it! You do, of course, make it look and sound easy!
LikeLiked by 2 people
patmcf
Never easy i just didn’t put in all the photos of me and all the super glue battles !! ,I just wonder why they make a product that works so well on human skin and is shit on anything one wishes to glue together !
LikeLiked by 2 people
Azazel
Well, one of the earliest uses of it was on Human Skin, after all!
https://en.wikipedia.org/wiki/Cyanoacrylate#Medical_and_veterinary
LikeLike
Marvin
Thanks for sharing this. One of those things where someone showing how they did it makes it even more amazing!
LikeLiked by 2 people
patmcf
It only occurred to me to do this when someone asked how to as they wanted to do one and that got me thinking about how many trick I have learnt from you guys and after talking to the Tech adviser ,she said that maybe I should return the favor by showing a few tricks of my own ,I am certainly surprised by the good response and will think of doing one again .
LikeLiked by 1 person
Mark A. Morin
You make this look easy Pat, but its clearly talented work, thanks for sharing your processes!
LikeLiked by 2 people
patmcf
Thanks for inspiring me Mate !
LikeLike
Pete S/ SP
Great walk through- really useful stuff in there.
Cheers,
Pete.
LikeLiked by 1 person
patmcf
Thanks Pete I’m you and all the guys have found it that way and I will consider doing one again ,as long as I remember to take those progress photos ha ha !
LikeLiked by 1 person
imperialrebelork
Great tutorial Pat. Well done
LikeLike
patmcf
Thanks mate ,I was able to get a bit more done what with the LSL ,but it’s back to the grind again so it will all slow down again .Sounds like you and your mob had a great time and seeing Peal harbor would have been an interesting experience ,any ideas were your next foray will be ?
LikeLiked by 2 people
imperialrebelork
Greece next big holiday but before that Tassie. It’s the only state I haven’t been to.
LikeLiked by 1 person
patmcf
Ha ha funny that ! I haven’t either but the family are of to Tassie in bloody July for the wife’s birthday gig ,and guess what , they are From Qld so they are going to have one hell of a great time as it’s already snowing now where we are going !!, you beat me though ,haven’t done WA .
LikeLike
Azazel
Great stuff again here Pat. Very interesting tutorial and I’ll remember that it’s here for when I get around to doing some more involved tiles. Even knowing how the sausage is made, so to speak, it’s a pretty remarkable transition from the raw materials to the finished product!
LikeLike
patmcf
Thanks mate ,I’m just glad I can give a bit back to the group as I have leaned a lot that has helped me improve my painting skills ,and you being a small part of that Ha Ha !
LikeLike